


Showing posts with label Bridal hair tutorial. Show all posts
Showing posts with label Bridal hair tutorial. Show all posts
Jul 6, 2014
 |
| 1. Blow dry the hair to create volume and to keep it shiny. |
 |
| 2. Section the hair into two and then secure it with a rubber band. |
 |
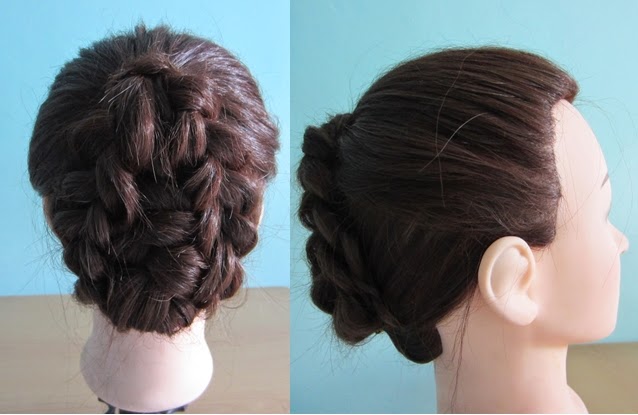
| 3. After sectioning the hair into two, the upper part of the first section, section it into three, the first section has to be a small amount of hair because it will be used just to cover the rubber band. The other two section should be in the same size. Then braid all the four sections as seen on the photo. After braiding, pinch all the braids to create a flow so the hair won't look flat and very elementary. |
 |
| 4. Roll over the lower braid upward and do the same thing with the other two upper braids in an opposite direction (means downward) then place it next (right & left) to the lower braid we finished. Then secure it with bobby pins. |
|
| This is how the finished product should look like. Products Used: Doll head from: hd makeupacademy Blower: Valera Professional Bobby pins: suesh ph |
  |
| 1. Blow dry the hair to create volume and to keep it shiny. |
 |
| 2. Tie the hair of to the the middle/below temple as seen on the photo. |
 |
| 3. Section the hair into two equal parts. |
 |
| 4. Twist the hair together to combine the two parts you separated. |
|
| 5. Wrap around into the center to create a small twist updo as seen on the photo and secure it with bobby pins. Products Used: Doll head from: hd makeupacademy Blower: Valera Professional Bobby pins: suesh ph |
Feb 9, 2014


1. Gather all the hair up to the crown and pony tail it sideways as seen in above photo. It's up to you wether you want it on the right side or left side.

2. Section the hair into three and start braiding.

3. After braiding take all the 3 braids to the right and scatter it like this so that all the braids are fronting to the right now.

4. To achieve the messy braids look start pinching each braid and place it side by side without leaving the gap. The three braids should be place connecting to each other sideways.

5. After pinching secure them with bobby pins. Make sure that there is no bobby pins popping out to make it as clean as possible.

Subscribe to:
Posts (Atom)


Popular Posts
-
 I always consider myself the lucky one. :) It's because whenever i joined the contest or giveaways online specially on instagram i ...
-
 What can I say? I'm So lucky for winning this Collection Makeup worth P2,000 I joined their online promo and luckily my ph...
-
 1. Blow dry the hair to create volume and to keep it shiny. 2. Tie the hair of to the the middle/below temple as seen on the photo. ...
-
 My day to evening makeup look.I attended a two Christmas Party yesterday. One is for the Company Union party and the other one is for our...
-
 Showing you some BTS shots of my recent photoshoot. Really some coz I only have 2 photos to show.:) Just a sneak peak. I'l have...